Thursday, December 08, 2016

ZX81 Draughts Challenge - Part 3 - Tims Checkers

As this whole little (and I say little in heavy quotes) escapade has been inspired by two very informative ZX-Computing articles penned by the late great Tim Hartnell, the game he inspired now bears the official title of "Tims' Checkers".

And as such this is now the official announcement and launch of the hightly anticipated, completely compelling retro-tastic ZX81 game "Tims' Checkers".

After the last blog entry I had hopped to have a couple of varieties of checkers available in the one game, unfortunately this was not to be. No doubt some of this is down to some slightly shoddy C programming, however there is one very valuable lesson to be learnt when using the WRX hires graphics mode in z88dk, namely that you loose at least 4k of valuable game writing space to the hires graphics screen itself. So what this largely means is that in order to keep the game within 16k limits, some things just had to be dropped.

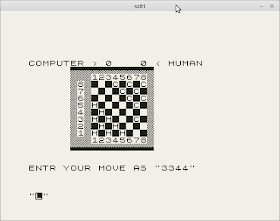
Would You Like to Play a Game?
So yes due to space constraints I've had to drop the multiple game play options, there is no option to play Spanish checkers or Corners as originally envisaged, instead what we do have is a full-ish checkers implementation.

The computer player has been enhanced from the basic opponent provided in Tims' ZX-Computing articles. Although again due to the self imposed space issues the ZX81 is not the most brilliant of strategists, yet competent enough to play an enjoyable and somewhat surprising game.

Basic Rules:

  • Men may move and capture only diagonally forwards.
  • Kings may move and capture diagonally forwards or backwards, but can not jump over empty squares.
  • If a player is in a position to make a capture then a capture move must be taken. If there are multiple capture options the player is free to choose. Once a man or king has captured that piece must continue to capture until there are no more capture options available.
  • If a man lands on the final row, the row furthest from a players starting position, the man is kinged.

A Bit Further in. The ZX81 has KInged.

Playing The Computer:

  • Select if you or the ZX81 goes first.
  • Use standard algebraic notation to enter moves.
  • There is no backspace, so if you start to enter the wrong move just make the rest of the entry an impossible move.

Really there is not much to it, after all checkers is a simple game and perfect for the ZX81. I'm considering this to a beta release, if you the prospective player find any glaring errors then please feel free to report them.

Download Tims' Checkers and give it a go in your favorite ZX81 emulator. Remember that you'll need to enable WRX graphics in your emulator to play correctly.

Monday, November 14, 2016

ZX81 Draughts Challenge - Part 2 - A Little Hi-Res

In the last post I took up a challenge set by Tim Hartnell 34 years ago, namely apply his BASIC ZX81 board games layout to multiple draughts games types. In this entry I'll delve into some of what's been put together so far.

In the Dec / Feb 1983 edition of ZX-Computing, Tim presented two versions of his finalised BASIC listing, one that plays the Corners variant of draughts from the previous ZX-Computing article, and another version that implements a Spanish checkers style game. The other standout new feature is the addition of a full screen and
 somewhat more graphical checkers board.

As graphics are where it's all at these days, best to start by bringing some major graphical improvements to Tims' Board. As covered last time, I'm developing (or is that re-developing?) the draughts game using the brilliant  Z88DK / C compiler. Of course C in itself does not have any real graphical capabilities, but thankfully within Z88DK are a host of ZX81 (and other micro-computer) targeted graphical options. Desire Hi-Res graphics on a ZX81? Yes we do. Well Z88DK has them, so of course we're going to be using those.

Draughts Board in Hi-Res ZX81 Style
There are three main parts to how I approached drawing the board and game men. Firstly, you can print regular characters with a simple printf("blah") statement, or the ZX81 character can be got at by switching with the zx_asciimode[0] command. More importantly the ZX81 BASIC "PRINT AT" statments are also catered for by Z88DK with the provision of the zx_setcursorpos(Y,X) function. Armed with these tools, the underlying checker board can be printed up quite easily.

Secondly, some nice Hi-Res flourished are easy enough to factor in with ZX88DK draw functions, such as drawing a boarder with drawb. All quite straight forward, with the exception that the Hi-Res screen does not allow normal characters to be output directly, as a different memory area is allocated to Hi-Res Graphics, one that swaps out the normal display page for its own. Again however once again there are commands for that. Anything written to the normal display can be copied to the Hi-Res display with a variety of copytxt() function options. So that's most of the standard display options accounted for.

Draughts Board Set up for Spanish Checks.
Thirdly, and lastly, the game men / pieces: There are options to define sprites for use with Z88DK, the men could have been created via this method, though at least for now, I've not used this functionality. Instead I've implemented a kind of User Definable Graphics option for the game men. The men are plotted via the Hi_Res functions onto the game board, thankfully this option is quite fast, and adds a nice animation quality. The UDGs are quarter of a full game piece, and credit to goes to the speccy_charater_builder website for making prototyping the men painlessly. The same UDG is used for both player and computer opponent. King pieces have also been defined for use in a fuller draughts game than described in the ZX-Computing articles.

That's it for the moment, in Part 3 I'll cover further graphic details as they affect the general game play and setup. I should say Games set up, as there are to be multiple draughts variants to choose from before the start of game play.


Sunday, October 23, 2016

ZX81 Draughts - Challenge Accepted 34 Years to Late

Way back in 1982, Tim Hartnell wrote the first part of a two article series detailing a method of creating board games on a computer for ZX-Computing magazine. At the end of the feature Tim expressed a desire to see what people made of his system, and send in their own programs derived from the article listings. Even though 34 years have passed since the article was first published, I thought I'd give it a shot. (Sadly Tim passed away in 1991).

Actually this is a multi level challenge, as I'm using Tims program and system to fiddle around some more with Z88DK, the C compiler for Z80 processors. Alongside this, I thought it would be interesting to see just how much faster a complied C program would run in comparison to a native ZX81 basic listing.

Tim Hartnells' Corners Program from 1982
I started by simply entering the listing as presented in the original feature, 'Board-Game Design' that can be found in ZX-Computing from Oct/Nov 1982. The entered program plays a fun rudimentary game of draughts, called Corners. Being a BASIC listing, the speed of the end result is best described as painfully slow. Of course given that we are talking about a BASIC program form 1982, written for a computer as simple as a ZX81, playing any sort of board game would have been considered a minor miracle at the time.

Next came a nearly straight conversion into C. I've pretty much used the exact structure of Tims' program as far as possible, in writing a version that would compile in Z88DK. Also none of the the more fancy features provided in the exteneded Z88DK ZX81 libraries were used (or for that matter any advanced C programing techniques) which is one reason why as you will notice when running the complied version that the screen redraw is not particularly seamless.

Z88DK complied C version of Corners
I did make some minor changes, the most noticeable being the layout, this is purely cosmetic, Another change, or rather oversight, I assume the Player always goes first. The real change was to add some extra checking into the validity of the Human players move. The original program assumed that the player was a humble honest sole, and never felt the need to cheat. That assumption also had a side effect of the program not checking the players move was even possible, and if not, the players move was basically ignored and the computer would gain a free turn.

In the end we have 2 quite passable ZX81 Corners (draughts) playing programs. But what about the speed test? Well the speed results are quite dramatic. The BASIC listing clocks in at around 12 seconds, just setting up the board in the background for the initial run (not including drawing the board itself). The Compiled C version takes about 2 seconds, including the initial board drawing. The overall speed difference just becomes more apparent from there on in.

Having tried out the BASIC listing and equivalent in C, it's now it's on to extending the program as Tim suggested. I'll continue to base the next version on the original idea. There is also the second article in the Dec 82 / Jan 1983 edition of ZX-Computing to peer into before proceeding.

Both versions of the Corners program are available in separate P files contained in zx81_corners_c_and_basic_files.tar.gz, and should run on any ZX81 emulator.

Hopefully soon I'll have a fine ZX81 board game playing program, 34 years after the initial call to action.

Sunday, October 02, 2016

Arduino Liberates the Recreated ZX Spectrum

Following on from the previous posts, in some free time this week, I butchered my ZX81 / AZ15 Arduino keyboard sketch libraries, sliced in some code for a USB host shield and beat an Arduino Leonardo into submission. The end result a fully working Recreated ZX Spectrum keyboard.

As talked about previously, the Recreated Spectrum has two keyboard modes, one for PS2 functionality and one for Emulation. The odd thing here being that in Emulation mode, the Recreated Spectrum is not compatible with the vast majority of Spectrum Emulators (at least at the time of writing). Disregarding this; Emulation or Mode 'A' as it is labeled, is the easiest to target for any external hardware solution used in remapping the Recreated Spectrum's keys in order to provide a Normal Spectrum Emulator experiance. See the previous post for a deeper explanation.

Emulation mode was quite straightforward in it's implementation, being that all keys are registered when pressed or released, if in a slightly odd way. It was a simple matter of matching the codes the Recreated Spectrum passed out on each of these events with the actual keys.

Once Mode 'A' was covered, it was time to move onto Normal / PS2 mode (Mode 'B'). Normally to enter either Mode 'A' or Mode 'B', a slider switch on the keyboard needs to be placed in the correct position. I decided that if using an external device to do the decoding, this mechanism would become problematic. Having already decoded Mode 'A' for usage, adding a simple keyboard selection would be simpler way to manage switching into Mode 'B' or vice versa. As a result, Mode 'A' is permanently set to on, at the back of the Recreated Spectrum, "CAPS SHIFT" + "SYMBOL SHIFT" + "ENTER" now changes modes on the external Arduino Leonardo based solution.

All key-mappings as described in the Recreated Spectrum's manual and Cheat Card remain the same, with the exception of the Windows, and Print Screen Keys which have been left unmapped at this stage.

While I've used a Leonardo and full sized USB host shield initially, there is no reason why a Pro Micro and mini USB host adapter could not be used to do the same thing. In fact one of the next steps could well be to do just that, along with mating the whole arrangement with a Raspberry Pi in a custom Sinclair inspired case.

For those that feel like a little experimentation, feel free to mess around with some hot of the presses Recreated ZX Spectrum Arduino Sketches. I'll be making changes regularly and the latest changes will be on the 'Recreated Spectrum Project Files to Download' page.

Also, make sure you download and install the Arduino USB_Host_Shield_2.0 libraries from Github before compliling the Recreated Spectrum Project Files.


Keyboard in Action

Saturday, September 24, 2016

It's all in the Modes & Mappings of the Recreated ZX Spectrum Keys

As mentioned last post, the keyboard works perfectly in the standard PS2 mode, it's the emulator 'layer' that has usage issues. If you switch to mode A (the emulator layer) on the keyboard, the key presses register anything but what you'd expect. There seemed to be some rather odd mapping going on, leaving the emulator mode a little useless.

There would seem to be 3 ways in which to adjust the Recreated Spectrum for usage with Emulators, other than the designated but pulled Elite variants.
  1. Patch an Emulator, or wait for support to be added. Apparently the some patches exist for the Fuse Emulator, adding compatibility for the Recreated Spectrum. That's no guarantee that other emulators will support it; I'd wager many gradually will, though you never know.
  2. Rip out the existing control board and build up a new version.
  3. Come up with an external hardware solution to adjust the key codes sent back to the host computer.
I guess option 1 would be the easiest, at least from a general user perspective, though unless your favorite emulator is open source, this could take a while. Option 2 is the most problematic, as to replace the board in a non case destroying way would be difficult (not impossible) to achieve. Frankly I don't want to ruin the look of the Recreated Spectrum with a hatchet job. That leaves option 3 as a pretty good alternative.

The PS2 mode would be the logical mode to tap into for signal / code modification, we need to see what the Spectrum keyboard actually sends out across the USB cable. To do this easily I pulled out an Arduino USB host shield to read the key codes are being sent. The results where interesting. Firstly, the standard PS2 layer (Mode B), was sending exactly what would be expected. With all letters and combinations of 'shift' and 'Alt' key presses being sent in a seemingly standard manner. I found one glaring issue that puts a stop to tapping into the PS2 mode however; the keyboard does not send any codes for the combination of "CAPS SHIFT + 9". What this means to those who have not already guessed, is that you can't set the keyboard to graphics mode.

So this leaves us with Mode 'A', the emulator layer. This is where things get interesting. A PS2 style keyboard will normally send codes stating when a key is pressed, and a similar code indicating that a particular key has been released. The codes the Recreated Spectrum is sending in emulator mode do not follow that pattern. Instead, when you press 'q', for example the keyboard sends the code for 'u' being pressed, however on release the keyboard send the code for 'v' being released. There is not a single key that sends just the expected letter. I've mapped the keys in the table below.


The Recreated ZX Spectrums Mode 'A' Key Mapping

KEY 1 2 3 4 5 6 7 8 9 0
PRESS a c e g I k m o q s
RELEASE b d f h j l n p r t
KEY Q W E R T Y U I O P
PRESS u w y A C E G I K M
RELEASE v x z B D F H J L N
KEY A S D F G H J K L ENTER
PRESS O Q S U W Y 0 2 4 6
RELEASE P R T V X Z 1 3 5 7
KEY CAPS SHIFT Z X C V B N M SYM SHIFT SPACE
PRESS 8 < - [ ; , / { ! %
RELEASE 9 > = ] : . ? } $ ^

As can be seen from the table, the key code order is layed out in a very neat and predictable manner. Also crucially, all key presses are detected in emulator mode, there are no dead keys combination problems such as in the "CAPS SHIFT + 9" issue discovered in PS2 mode. This all makes adding a man in the middle hardware solution relatively easy to implement.

The next step is to write some Arduino code to see just what we can achieve.

Tuesday, September 20, 2016

Half Recreated ZX Spectrum

Curiosity got the better of me, with some help from continuous price drops and forced my hand into the procurement of a Recreated ZX Spectrum. The Elite Systems clone of the original Sinclair Spectrums keyboard was one of the inspirations behind the starting of this blog. Given these reasons (or excuses) it's not surprising that I felt the desire to try one out, a kind of celebration of the year since beginning the AZ15 project.


I'm not in much of a position to pass judgement on the overall look, feel or experiential replication embodied by the Recreated ZX, you see I've never owned a rubber keyed Spectrum (I had a +2a for a while quite recently), in fact I've only ever seen them in the wild twice. The most recent Spectrum encounter was with an extremely beaten up system found resting quietly in a computer store in Delfzijl, up in the north eastern Netherlands.

My only other brush with a rubber Spectrum was half a world away and decades in between, at the Sydney Personal Computer Show in 1983, where Sinclair had a very prominent and striking black pavilion right at the entrance to the exhibition. As a young teenager and ZX81 owner, this encounter was beyond exciting, though sadly owning one of the beasts on display was not in my near future.

Regardless of the above, we can still judge the Recreated on it's functionality as a keyboard. There are good and bad points to this device. The good points first. The keyboard is stunning, I mean really stunning, it does look to me (with my limited experience) look like a Spectrum. Secondly the keyboard works flawlessly, at least for a rubber keyed throwback to times past as a PC keyboard, though certainly not recommended for daily typing. Frankly is quite fun to use the keyboard, gaze at the keyboard and generally fiddle with it for a while.

Despite the attention to detail shown externally and in the immediate PC-keyboard compatibility, the real use for this keyboard is with Spectrum emulators. This is where functionality falls apart. For whatever reason Elite crippled the keyboard by limiting its emulation use to Elites own suite of applications. None of these Elite applications are supported, let alone available due to ongoing legal disputes. So unless Emulator writers decide to include support for the Recreated Spectrum, the device is functionally useless for emulation purposes. 

There is of course always an option another option: Rip out the internals, grab an Adruino or other micro-controller and retrofit for purpose. In fact retrofitting looks quite achievable, I haven't as yet opened the little box up to check it over, but Tero Heikkinen at the Old Machinery blog has and the possibilities are promising. So this is what I think I'll end up trying out, and if so, I'll of course post the details here.


Tuesday, September 13, 2016

The ZX81, Z88dk, Apps & Roman Numerals.

So what do you do with a Raspberry PI / Arduino ZX81 frankensteinian clone beast, that is other than play copious amounts of games?

In a world full of mobile phone apps, it's easy to forget that effectively computers of the ZX81s ilk only ever really ran what we would now consider apps. Refer to any listing in say, the magazine ZX-Computing, one that isn't a game of some dubious nature for examples. The case being, that really very serious software just wont fit into 16k, let alone 1k of RAM. (With all apologies to the masters of machine code and their associated assembly acolytes, who are at this very moment proving my point entirely incorrect.)

Of course all of the above being the case, the answer to the lead question is of to this post, is write an app.

Thanks to the wonders of the post-modern age, apps can quite easily be developed off on a PC some place, then cross complied for injection back into the plastic doorstop that is a ZX81. To give this all a good go, it was off to Z88dk, the C development tool of choice for targeting Z80 based machines.

I'm not about to bore the world with a run down on the inner most workings of Z88dk, not least because never really having used it before, my 2 cents of input here is not going to help anybody. Suffice to say that it's pretty easy to get to grips with, and really the hardest part about it is that you end up primarily programming in C.

Which leads to the point that there is only one really good reason that explains the existence of C++, and that is the annoyance that is C and specifically Cs' painful handling of Strings. The String and C problem being an extra annoyance as the App I ended up making was a conversion of a Roman Numeral Format checking applet, I'd originally written in Java and then moved to C++, an applet that I'd made the Strings do all the heavy lifting in.

Anyway, regardless of any pet C based grievances, Z88dk is brilliant, and in the end I produced a passable piece of ZX81 software.


The "ZX Roman Numeral-izer" is born.

The only real hard and fast rules to Roman Numeral conversion is this: Always add the numbers together from left to right, unless the numeral to the right is of a lower value, in that case subtract that numeral. That's it, see Wikipeadia for a better explanation.

Of course there is a correct, strict and socially acceptable way to format Roman Numerals, and this is precisely what my little ZX81 app is designed to do. It will check your dodgy formatting, make an informed guess at what you meant, spits out an Arabic Number and presents you with the Correct Roman formatting.

For the moment I've left the app a little bit on the gamey side, it's up to you to try and format your Roman Numeral correctly, there is no Arabic Numeral input option. The code behind the app would easily allow for it, I've just not implemented that extra code as yet, (and possibly wont).

You can download ZX Roman Numeral-izer and give it a go in your favourite ZX81 emulator.

Sunday, August 28, 2016

AZ15 Raspberry PI 3 Upgrade

I've taken the opportunity to upgrade the heart of the AZ15 to a Raspberry PI 3, up from a PI 2. The neat thing about the last few models of PIs' has been the unchanging form factor with increasing capabilities.

There has been a noticeable speed boost between the PI 2 and PI 3, this has been most evident when using the ZEsarUX emulator. Previously ZEsarUX has seemed somewhat sluggish on the PI 2, leaving SZ81 as my emulator of choice. With the performance improvements on the PI 3, the choice of emulator is now wide open, a nice change indeed.

Also  the PI 3s' addition of baked in Bluetooth and WIFI has meant that a number of the USB ports formerly dedicated to these tasks are suddenly free. With the PI 2, I had dedicated one of the internal (to the AZ15) USB ports to a WIFI dongle, with the advent of the PI 3 new found connectivity option, I've instead inserted a small in stature and capacity USB flash drive for ZX81 ''P" file storage. Additionally with Bluetooth now available, wireless mice in particular are easy to add.

AZ15 With Bluetooth Mouse and WIFI

AZ15 Concept Image

A What's in the Box Shot


All the nice additions to the PI 3 bring the whole AZ15 project pretty damn close to the original concept image; thanks to the addition of a Bluetoooth mouse and the ever unseen WIFI.

So now it's time for a new glory shot, a shot which I've taken at as close to the same angles and lighting conditions as manageable.

What do you think?


Sunday, August 21, 2016

Brand New Version ZX81 Arduino Keyboard Sketches

This week brings major changes to the Arduino sketch, so big I'm calling this latest modification version 2.

The last update still left me somewhat dissatisfied with the keyboards performance in some emulators. The deficiencies were particularly apparent when playing games, where the keyboard would not respond smoothly and in a timely fashion. To remedy the response time problems, I went back and re-examined how the code was first put together.


When Originally written, I'd relied on the Keyboard.print function to send key presses, which worked fine during initial testing. Unfortunately that didn't work so well when incorporate the shift, graphics and function modes into the keyboard. Using the Ardunio keyboard Keyboard.press functionality solved that issue and all seemed to be okay for a while. There were still some problems that become noticeable in various emulators, and these I addressed with some debouncing routines (which culminated in the last code release).

To cut it all short the debouning routines were the completely wrong solution to the problem and as it turned out I'd completely overlooked a decent Keyboard.release method. After a mild dose of head scratching in the effort to remedy past errors, I'm releasing what I'm calling version 2 of the sketches.

The Version 2 removes the kludge of keyboard debouncing, and now thankfully we have a keyboard that functions just as well as that on any self respecting ZX81.

The command line / serial switches have, thanks to the changes, slimmed back down. The need for extra commands to set extended emulation behavior have been removed.


Command Line, Mode and Options Selection
BELLSound the LeoStick Piezo. Could be used to forward audio system notifications etc. 
BEEP OFFTurn off Keyboard Sounds. Sounds are off by default.
BEEP ONTurn on Keyboard Sounds. Similar to the keyboard clicks made by ZX Spectrum when typing. The keyboard only emits clicks in Standard mode. In Emulation mode sound is always off.
DEVICEReturns message "ZX81_KEYS" to the console. Useful if unsure you have the correct serial port. You must be monitoring incoming streams to get the return message. eg cat /dev/ttyACM0
EMULATORSwitch the keyboard into emulator mode.
STANDARDSwitch the keyboard into standard mode.

All versions of the keyboard sketches are avaliable from the Project Files page.

Sunday, August 14, 2016

Arduino Sketch Updates for Keyboard Debounce Timimgs

I've made some minor changes to the Arduino sketches over the weekend. The alterations affect the debounce timings, where I've hopefully improved keyboard response while in EMULATOR modes. The latest Code can be downloaded from Project Files page.

A new switch DBEM ON / OFF, for piping to the Arduino serial console, has been added. The switch is designed to set the STANDARD mode debounce timimgs to those use in EMULATOR mode. This is particularly useful if the emulator frequently requires the keyboard to be switched to STANDARD mode. I found that in particular ZEsarUX requires STANDARD mode to be set quite often to load files or change options etc.

The below example  sets the keyboard to EMULATOR mode, sounds the BELL and turns DBEM ON.

echo emulator bell dbem on> /dev/ttyACM0

Setting DBEM ON will also negate the use of the BEEP ON option. For more extra information on switches see the earlier blog entry AZ15 and A Tale of Two Features.


Command Line, Mode and Options Selection
BELLSound the LeoStick Piezo. Could be used to forward audio system notifications etc. 
BEEP OFFTurn off Keyboard Sounds. Sounds are off by default.
BEEP ONTurn on Keyboard Sounds. Similar to the keyboard clicks made by ZX Spectrum when typing. The keyboard only emits clicks in Standard mode. In Emulation mode sound is always off.
DBEM OFFUse normal STANDARD mode debounce timings. This is the default option.
DBEM ONUse EMULATOR keyboard debounce timings in STANDARD mode. Good to set if switching to STANDARD mode frequently while using an Emulator. Switch was added with ZEsarUX in mind in particular. Default if off.
DEVICEReturns message "ZX81_KEYS" to the console. Useful if unsure you have the correct serial port. You must be monitoring incoming streams to get the return message. eg cat /dev/ttyACM0
EMULATORSwitch the keyboard into emulator mode.
STANDARDSwitch the keyboard into standard mode.


Saturday, August 13, 2016

ZX81 Kiosk Mode for Raspberry Pi / AZ15 (Part 2)


In Part 1, we setup the AZ15 to boot into a kiosk mode that relied on X11. This is all well and good, but why use an X11 windows manager when we don't really need to.

All the major ZX81 Emulators available for use on the Raspberry Pi have SDL versions available, and SDL dosn't require an X11 windows manager. Booting right into an emulator will speed up the startup process and get us "programming" our ZX81 in not time at all.

All the hard work such as installing the sz81 emulator was covered in Part 1. This time around we only need to make some minor alterations.

Auto Login the PI User to the CLI


First off, a couple of minor config changes from the last blog entry. We need to set auto login to the CLI instead of the Desktop. From the X11 desktop (startx if you need to), access the graphical config utility using the “Preferences” > “Raspberry Pi Configuration” menu. Set the options as below:


Auto Run the ZX81 Emulator at Login


Next up add the following Code to the end of your /home/pi/.bashrc file.


# Run if tty1
if [ $(tty) == /dev/tty1 ]; then
 # *** Configure and Run the ZX81 emulator ***
 # If you have ZX81 P files / Roms in a handy Dirctory, cd to it first.
 # This obviously makes life easier later on.
 cd ~/Files/emulation/zx81

 #Set az15 keyboard options, if you haven't built a az15 the comment this out.
 echo emulator bell beep off dbem on> /dev/ttyACM0

 # Run the sz81 emulator in fullscreen mode
 sz81 -f -1024x768

 #Set az15 keyboard options, if you haven't built a az15 the comment this out.
 echo standard bell beep on dbem off> /dev/ttyACM0
fi


That's it, we can now boot right on into the emulator after the next "reboot".

A Little Extra Visual Config Enhancement


Normally when the Pi boots up a whole load of logging and informational messages scroll down the screen. While this is all very useful information (depending on your perspective), it's not exactly helping generate that 80s mircro-computer vibe.

So let's hide the information overload by adding some extra switches into the Raspberries "cmdline.txt" file.

sudo nano /boot/cmdline.txt

All the configuration options will be on the first line of the file, change the following details.

Find:
console=tty1

Change to:
console=tty3

Next, add the following commands to the end of the line.

loglevel=3 logo.nologo

If you reboot now, having made the above changes in combination with Part 1's instructions, then you should see something very similar to the video clip below. (You'll probably also notice I changed the Splash Screen).


Now the AZ15 has booted up, we're ready to do some serious programming, or the somewhat more likely scenario, play the excellent "Crozxy Road" from Bobs Stuff.


Wednesday, August 03, 2016

ZX81 Kiosk Mode for Raspberry Pi / AZ15 (Part 1)


The final piece to the ZX81 keyboard puzzle is to get the Raspberry Pi / AZ15 to boot like it's 1981, arriving straight at the Sinclair "K" prompt after being switched on. Booting won't be measured in seconds (actually it comes in at about 20 seconds) as it was in 1981, after all 35 years of progress takes extra time. Though to be fair, the loading of software after booting up a ZX81 was measured in aeons.

There are many ways to boot a Pi into a Kiosk like mode, I've gone with one of the easiest, simply hijacking the pre-existing Openbox Xsession. The process outlined below is applied on top of a default Raspbian Jessie installation.

Installing the sz81 Emulator


Fist up you'll need a ZX81 emulator, I've been using various sz81 versions to test the AZ15, and have found the last official release, sz81-2.1.7,  the most stable for my purposes.

- Download the official sz81-2.1.7 release of sz81 from http://sz81.sourceforge.net/
- Alternatively, experiment with the unofficial updates provided at http://rullf2.xs4all.nl/sz81/

After downloading and decompressing the sz81-2.1.7-source.tar.gz file, edit the makefile in the source directory, and change the installation type to system wide. Full details can be found in the sz81 REAME file.


# Comment/uncomment these to choose an installation destination
# System wide installation
PREFIX?=/usr/local
BINDIR?=$(PREFIX)/bin
DOCDIR?=$(PREFIX)/share/doc/$(TARGET)
PACKAGE_DATA_DIR?=$(PREFIX)/share/$(TARGET)


Also, if not already installed grab, the SDL develpment libararies from the repositories, as these will be required before compiling the sz81 source.

sudo apt-get install libsdl1.2-dev

Then from the sz81 source directory, make and install sz81 itself.

make
sudo make install


Auto Login the PI User


Now that we have an emulator installed, we'll want it to execute on boot up.

If the Pi isn't already configured to Boot to the Desktop and / or Auto Login, you can access the graphical config utility using the “Preferences” > “Raspberry Pi Configuration” menu. Set the preferences as below:


If your Raspberry Pi wasn't previously configured to boot to the desktop, reboot it now before continuing, in order to test all is well so far.

Simple PI / ZX81 Emulator Kiosk


Raspbian Jessie ships with 3 pre-configured desktop environments:


  1. Default Xsession: An LDXE enironment using version 3 GTK+ of toolkit
  2. LDXE: An LDXE enironment using version 2 GTK+ of toolkit
  3. Openbox: Amazingly configurable Desktop


For our purposes we'll essentially hijack Openbox for auto logon and startup the sz81 emulator. Openbox is a very user configurable and we shall be ignoring most of that power co-opt it for our Kiosk style login.

Editing or create an OpenBox autostart file (using Geany or Nano from a console) in a sub-directory off the pi users home directory.

nano ~/.config/openbox/autostart


# *** Set some Openbox options ***
# Set a background colour to Black
BG=""
if which hsetroot >/dev/null; then
  BG=hsetroot
elif which esetroot >/dev/null; then
  BG=esetroot
elif which xsetroot >/dev/null; then
  BG=xsetroot
fi
test -z $BG || $BG -solid "#000000"

# *** Configure and Run the ZX81 emulator ***

# If you have ZX81 P files / Roms in a handy Dirctory, cd to it first.
# This obviously makes life easier later on.
cd ~/Files/emulation/zx81

#Set az15 keyboard options, if you haven't built a az15 the comment this out.
echo emulator bell beep off> /dev/ttyACM0

# Run the sz81 emulator in fullscreen mode
sz81 -f -1280x900

# *** On emulator Close exit Openbox ***

#Set az15 keyboard options, if you haven't built a az15 the comment this out.
echo standard bell beep on> /dev/ttyACM0

openbox --exit


Save the files and that's the basic kiosk like configuration completed.

Now log out of the default LXD environment. Once back to the logon screen, select Openbox from the drop down menu on the top left of the screen. If everything has gone to plan the sz81 emulator should startup.

If you now exit the sz81 emulator, you should once again be dropped back to the logon screen. This time select Restart from the power menu and the PI should boot directly into Openbox and open the emulator, as by default the last Desktop Environment will be selected on a system restart.

Retro Pixel Inducing Splash Screen

Setup a Splash Screen


Get into that 80s spirit with a Loading Screen. Technically there were no splash screens on a ZX81, unless you count the wavy lines that take over the screen when loading from tapes, but lets no spoil things. I've made up a rather retro and referential black and light grey image for the purpose, but use what ever image floats your boat.

Log onto the console and create a directory.

sudo mkdir /etc/images

Copy your chosen image into that directory, make sure your image is in the PNG format.

sudo cp /home/pi/"YOUR IMAGE".png /etc/images/az15-splash.png

Now we need a FrameBuffer Image viewer to run on boot.

sudo apt-get install fbi

Create a startup file and edit the contents.

sudo nano /etc/init.d/az15-splash-screen


#! /bin/sh
### BEGIN INIT INFO
# Provides:          az15-splash-screen
# Required-Start:
# Required-Stop:
# Should-Start:      
# Default-Start:     S
# Default-Stop:
# Short-Description: Show custom splashscreen
# Description:       Show custom splashscreen
### END INIT INFO

do_start () {
  /usr/bin/fbi -T 1 -noverbose -a /etc/images/az15-splash.png    
  exit 0
}

case "$1" in
  start|"")
    do_start
    ;;
  restart|reload|force-reload)
    echo "Error: argument '$1' not supported" >&2
    exit 3
    ;;
  stop)
    # No-op
    ;;
  status)
    exit 0
    ;;
  *)
    echo "Usage: az15-splash-screen [start|stop]" >&2
    exit 3
    ;;
esac

:


Now, make the file executable and get the system to recognise it as an init script.

sudo chmod a+x /etc/init.d/az15-splash-screen
sudo insserv /etc/init.d/az15-splash-screen

Reboot and you should have something very similar to the video clip below.


Credit Where It's Due Most


Much thanks to the following sites and blogs describing the exact or very similar processes, leading to an article that's boarding on plagiarism.

Run a ZX81 Emulator in "kiosk" mode on a Raspberry Pi
Building a Raspberry Pi Kiosk
Openbox Wiki Entry on Autostart